How to Repair Drywall After Water Damage
How to Repair Drywall After Water Damage
If you've recently dealt with water damage in your home, you're probably feeling overwhelmed. Whether it was caused by a flood, a burst pipe, or a sewer backup, the aftermath can be stressful. In this article, we want to walk you through this process step by step so you can understand what to expect and how to get your walls looking brand new again.
What Is a Drywall Flood Cut?

One of the most common repairs after water damage is the drywall flood cut and repair. A drywall flood cut is a strategic removal of the bottom section of drywall—typically 12 to 24 inches above the floor. The purpose of this cut is to remove damaged, soaked drywall and allow proper drying of the framing and insulation behind it. Leaving wet drywall or insulation in place can lead to mold growth, structural issues, and long-term damage.
Types of Water Damage That Require a Flood Cut
Understanding the type of water damage your home has sustained is crucial because it determines how the repair process should proceed.
1. Flooding
Natural floods and ground water bring in water that often contains contaminants, bacteria, and debris. Floodwater can pose serious health risks. If your home has been affected by a flood, you’ll need to remove and replace any drywall that has come into contact with floodwaters.
2. Sewer Backup
A sewer backup is another serious issue, as it introduces bacteria and viruses into your home. This type of damage almost always requires cutting out affected drywall and disinfecting the surrounding area before replacing it. Any insulation behind the wall will also need to be replaced.
3. Burst Pipes
While burst pipes might seem less severe than flooding or sewage backups, they can still cause significant damage. If the leak is caught quickly, you may only need to replace a small section of drywall. However, if the water has been sitting for an extended period, mold can start forming, making a flood cut necessary.
Step-by-Step Guide to Repairing a Drywall Flood Cut
Step 1: Ensure the Area Is Dry
Before repairing drywall, it’s essential to make sure everything behind the wall is completely dry. Use fans, dehumidifiers, and, in some cases, professional drying equipment. Moisture meters can help confirm that the wood framing and insulation are dry before closing up the wall.
Step 2: Cut and Remove the Damaged Section
Using a chalk line and a utility knife, make a clean, straight cut 12 to 24 inches above the floor. This ensures that all compromised drywall is removed and that you have a straight seam for the new drywall to fit.
Step 3: Replace Insulation (If Needed)
If insulation was damaged, remove it and install new insulation before putting up new drywall. This step is crucial for maintaining energy efficiency and preventing future mold growth.
Step 4: Install New Drywall
Measure and cut a new piece of drywall to fit the gap. Secure it to the studs with drywall screws, ensuring a tight, flush fit.
Step 5: Tape and Mud the Seams
Use drywall tape to cover the seams between the new and existing drywall. Apply joint compound (mud) over the tape, feathering out the edges for a smooth transition. Let it dry completely before sanding. Normally there are multiple coats that must be applied and then sanded to get a smooth finish.
Step 6: Apply Texture or Smooth Finish
This is where many homeowners have questions about how to match the existing texture. If done right, the repair will be almost impossible to notice. If the texture doesn’t match, you will always have a reminder of the water damage. This is one of the most important steps to making it look good.
Smooth Finish: A smooth finish requires careful sanding and multiple layers of joint compound to achieve a seamless look. This is more expensive to repair professionally because it is difficult to match properly and it usually takes multiple trips.
Textured Finish: If your existing walls have a texture, you’ll need to match it. Common textures include orange peel, knockdown, and popcorn ceiling. This step can take practice, but spray-on texture can help blend the repair with the rest of the wall.
Step 7: Replace Trim and Doors
Once the drywall repair is complete, it’s time to reinstall the trim and doors. It is important to find trim that matches the current trim to keep the repaired area from standing out. Once you have the trim, cut the new trim pieces to size, ensuring a snug fit against the repaired wall. Make sure to leave the proper space under the trim for the flooring that is going to be installed. Use finishing nails or a brad nailer to secure the trim in place, making sure it aligns evenly. Fill any gaps or nail holes with caulk or wood filler for a polished look. Finally, sand, prime, and paint the trim to match the rest of the room for a seamless finish. This final touch not only completes the repair but also restores the aesthetic of your space.

Step 8: Prime and Paint
Once the texture is complete and dries at least 24 hours, apply a PVA primer to ensure the paint adheres evenly. Then after the primer coat dries, paint 2 coats on the repaired section to match the rest of the wall. If your paint has aged, blending may require painting the entire wall for a seamless look.
Final Thoughts
Experiencing water damage is never easy, but repairing a drywall flood cut doesn’t have to be overwhelming. By understanding the process and knowing what to expect, you can ensure your walls are restored correctly and safely. If you're not comfortable tackling this repair yourself, our team at Big Wheel Handyman in Denver, CO, is here to help you. We specialize in getting your house back to the way it was before the water damage occurred.
Drywall "Flood Cuts": The Denver Homeowner’s Guide to Post-Puddle Recovery
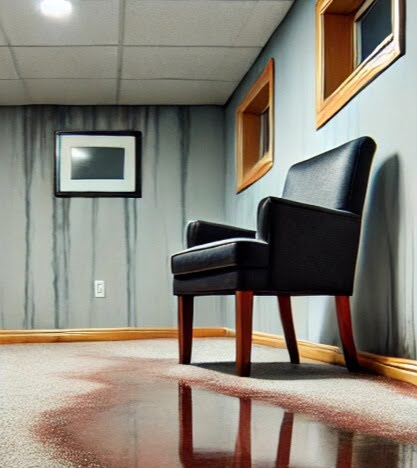
We’ve all been there. You head down to the basement to grab a bag of chips or a holiday decoration, and—squish. Whether it’s a rogue pipe that gave up the ghost or a classic Denver spring flash flood, water damage is a massive headache.
At Big Wheel Handyman, our motto is Communicate, Care, and Repair. We know that seeing your drywall cut open can be scary, but it’s actually the first step toward a healthy, mold-free home. Let’s break down the "Flood Cut" and how we get your walls back to looking like that leak never happened.
What on Earth is a "Flood Cut"?
If you’ve had standing water, you’ll likely hear a professional mention a flood cut. This isn’t just a random hack job; it’s a strategic surgery for your house.
A flood cut involves removing the bottom 12 to 24 inches of drywall above the floor. Why? Because drywall acts like a giant sponge. Even if the water only touched the bottom inch, that moisture "wicks" upward. By cutting a clean line above the watermark, we pull out the soggy mess and let the wooden "bones" (the studs) of your home breathe and dry out.
Know Your Water: The Good, The Bad, and The Ugly
Not all water is created equal. The type of water dictates how much "surgery" your wall needs:
Category 1 (Clear Water): A burst supply line. It’s clean, but if it sits for more than 24-48 hours, it graduates to the "bad" categories.
Category 2 (Gray Water): Think washing machine overflow or a dishwasher leak. It’s got some "funk" (detergents/nutrients) that mold loves.
Category 3 (Black Water): Sewage or outdoor floodwater. This is the "No-Go" zone. If this touches your drywall, it’s a mandatory removal to protect your family’s health.
The Anatomy of a Flood Cut

The Big Wheel Step-by-Step Recovery Plan
1. The Big Dry
We don't close anything up until it's bone dry. We use professional moisture meters to check the studs. If you trap moisture behind new drywall, you’re basically building a "mold hotel."
2. The Clean Cut
We use a chalk line to ensure the cut is perfectly level. This makes the eventual "patch" much easier to hide.
3. Insulation Check
Wet fiberglass insulation is useless. We pull it out and replace it with fresh, fluffy stuff to keep your Denver home cozy during those 20-degree nights.
4. Hanging and Finishing (The Art Form)
This is where the magic happens. We install the new "rock," tape it, and apply multiple coats of joint compound (mud).
The Pro Tip: Matching texture (Orange Peel, Knockdown, or Smooth) is what separates a DIY job from a professional one. In Denver, many older homes have a Smooth Finish. This is the "Final Boss" of drywall—it takes multiple trips and expert sanding to make it invisible.
5. Trim and Toes
Once the walls are textured, we reinstall your baseboards. We make sure to leave the perfect gap for your new flooring.
6. Paint he Final Touch
Once your texture has dried for at least 24 hours, it’s time to make the repair disappear. This is the stage where most DIY jobs stand out, but a few pro steps can ensure a seamless blend.
PVA Primer is Non-Negotiable: Fresh joint compound is incredibly porous. If you paint directly over it, the patch will soak up the moisture, leaving a dull, noticeable spot known as "flashing." Always apply a coat of PVA primer first to seal the surface.
Blending the Color: If your existing wall paint is more than a year old, it has likely faded slightly. Even with the original bucket, the "new" paint might look darker. To fix this, feather your edges outward or, for the best results, paint the entire wall from corner to corner.
For a detailed walkthrough on how to get that perfect, invisible finish, check out our Step-by-Step Guide for Painting a Drywall Repair.
Let's Talk Numbers: What Does This Cost?
Transparency is part of how we Communicate. Small repairs can be as little as $450 and entire basements can be $8000+ depending on the size of the damage. For more details please visit our Customer Care Page and upload a few pictures. We've included a picture of a recent repair with pricing to help give you a ballpark price for your project.
> Note: For flood cuts, the price often depends on the linear footage and access.
: Before and after of a Denver basement flood restoration: $2,500 repair featuring new wall studs, insulation, and textured drywall across two finished walls.")
Final Thoughts
Water damage is stressful, but it's also an opportunity to make sure your home is healthier than it was before. Whether you need a small patch or a full basement "flood cut" restoration, the team at Big Wheel Handyman is ready to help.
For more information on our process and how we handle your home with care, Contact Big Wheel Handyman Today for a No-Hassle Estimate